Tuesday 3 February 2015

Free 3D Game Asset: Fishing Boat

Another totally free 3D model of a fishing boat including:
- diffuse textures
- glow effect flares
- ambient occlusion map
- animated smoke alpha texture
- animated normal map for liquid simulation
- GLSL Refraction Shader for liquid simulation
License:  Attribution CC BY


Use Blender version 2.72 or higher

Here's the download link:
Fishing Boat

More stuff coming soon.
Stay tuned...

Sunday 4 January 2015

Free 3D Game Asset: English Cottage

Here's another totally free 3D model of an English cottage including;
- diffuse textures
- ambient occlusion maps
- normal maps
- reflection map
- mask texture
This package contains a 'game ready' model encapsulated in the '.blend' file format and is licensed under the most accommodating version of the Creative Commons - Attribution CC BY


Here's the link:
English Cottage

I hope it's useful to someone out there.
More stuff, coming soon.

Cheers.

Wednesday 24 December 2014

2014 Xmas Gift: Totally Free 3D Assets

I haven't posted anything for a while, so I thought I'd make up for it by giving away some 3D Art with no strings attached. They are all licensed under the most accommodating version of Creative Commons - Attribution BY
The package contains 'game ready' models and textures encapsulated in the '.blend' file format (www.blender.org).


Here's the link:
Japanese Garden

I'll be posting a lot more soon, so watch this space ...

Merry Xmas

Friday 29 June 2012

Spy Story : New Update

This is the second update of my 'Spy Story' game, which adds more interactivity to the main level and some improvements to the intro and auxiliary game screens.

I've designed the 'Training' level to be a sand-box-test environment, where ideas can be quickly implemented; some of which I will keep; others I will discard. 

The bulk of the code is in the form of Javascript with a few C# modules linked-in. The main engine is Unity.

I spent a lot of time recently, coding a weapon-targeting system, which uses a ray-casting process to ensure accurate aiming; whether firing from the hip, or directly through the weapon's optical-scope and I've used an 'additive-blended-shader' inside the scope, so that the player benefits from a night-vision effect in dark zones.


 A health system was added and linked to the player HUD, which responds to weapons-fire from enemy *NPCs and hazard regions.

For example, if the player enters a toxic lake, a red-out effect illustrates that the character is being harmed, whilst health points are removed from the HUD icon.

The player can also be killed by falling from a pre-determined height threshold, such as the top of a building, or a cliff.


When the player is dead, the level will automatically reset and the character will re-spawn.


 Objects can now be 'tagged', in the code, as 'Explosive', which will trigger a particle effect when they are shot by the player or an NPC. The object is then deleted from the game world. Object deletion will also occur on NPCs that have been killed.

  
The player can now climb any structure in the game with the addition of a climbing script that works in conjunction with invisible trigger zones.

 
Finally, the biggest improvement comes with the addition of Enemy AI. NPCs can now patrol an area determined by a waypoint system. Should the player enter their attack range, they will stop patrolling and move directly towards the player-character and enter an attack mode.

*NPC - Non Player Character

Here's the gameplay video:


P.S.   I've uploaded the G36C Assault Rifle. 
You can download it here: 
You are free to use it in your own creations.


Tuesday 20 March 2012

Software Review

Blender 2.62 Cycles Rendering 
(It's buggy, but it's good)
Click-on images for a larger view
Machine Spec:
Pentium 4 Core2Duo 2.93 Ghz
3 GB RAM
ASUS P5N-D Motherboard
nVidia Geforce 550GTX Ti 1GB DDR5 192 CUDA Processors.

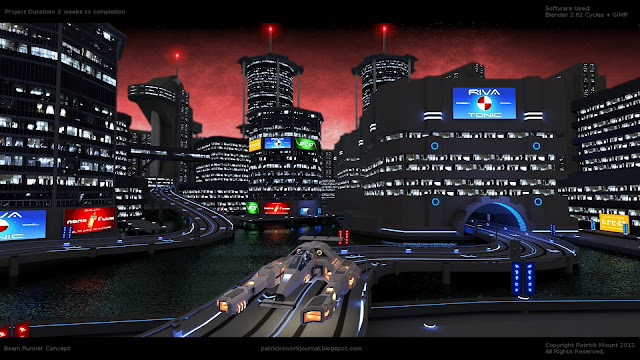
I felt the urge to build a space ship and, at the same time, experiment with Blender's new rendering engine, which is called 'Cycles' for some reason.
After two weeks, I am reasonably satisfied with the end-result; a large scale, futuristic environment, rendered more in the spirit of a concept design than a final show reel scene. Here's what I uncovered.
 
Let me start-off by emphasising four simple facts about Cycles: 
  1. It is a work in progress - possessing several known bugs that will undoubtedly be fixed in the near future.
  2. It is more powerful than the old internal rendering system, enabling full global illumination, soft shadows via bounced light etc.
  3. It is significantly easier to work with than its predecessor, especially with regard to the creation of materials.
  4. You will probably need access to a Cray Supercomputer if you want to animate with it. I calculated that on my machine, with 2000 samples per frame, it would take approximately 240 hours to render a 60 second animation. That's 10 days of continuous GPU run-time.
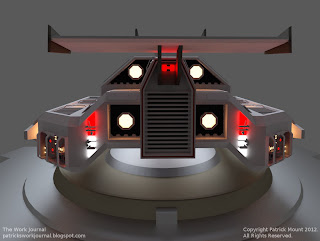
 The design for the ship came together pretty quickly. I wanted to create a hybrid amalgamation of an X-Wing fighter and a ship from Sony's Wipeout game; something that could race around a track and venture into the vacuum of space. I also threw some Formula 1 into the mix.


As you may be aware from my previous posts, I like Node-Editors; they make sense to me; they express a rational work-flow in a schematic way, and it is relatively simple to follow the ebb and flow of data as it passes through each node in the network. Cycles  is fundamentally based on Blender's node editor, but it also gives you the flexibility of working with the familiar side-panel tool bar, should you wish. I found that the best approach was to create a basic material with the tool bar then switch to the node editor to add greater depth and complexity to the material.


The rendering system works by processing the scene in a number of passes ( or cycles - Ah! That's why it's called Cycles).
Each pass adds more detail, or pixel-resolution to be more precise. For a very simple scene, you will only need around 500 passes. For a complex scene, you will need at least 2000 passes.

I wanted the project to be more about the concept than a finished piece, so I decided to keep the UV unwrapping to a minimum and create a simple decal shader.

For this to work, you need two image files; the color map for the decal and the grey-scale alpha mask - in which white represents full transparency, black is fully opaque and the grey scale represents varying degrees of semi-transparency. Here is the node setup:

 For the main environment, I needed a water shader. Obviously, I wouldn't be animating it, so I used a seamlessly tileable Perlin Noise texture and plugged it straight into the Displacement Input. I made the water color green with lots of grey mixed into it and then applied it to the Glossy shader node. See below:

Okay! If you're still reading this then you probably want to know about the problems I encountered. Here goes:
My computer crashed frequently, particularly when I switched to the F12 Full Render Mode from inside a Camera Viewport. I think this is already flagged-up in a bug report.
There was a constant error message in the console window which read:
"ShaderGraph connect: can only connect closure to closure". I have no idea what this means.

The worst problem was rogue pixels. This took the form of sporadic white pixelation on dark surfaces, or black pixelation on light surfaces. It seemed to get worse as the scene increased in size and complexity. I had to manually remove each of them using GIMP.

I think what Cycles really needs is a Render Baking option that would allow for the creation of GI light maps (Gile[s] already does this).
This would be useful, not just for video game developers like myself - who need their scenes to run at 60fps, but for anyone who just wants to produce an animation. Baked Global Illumination, applied as a texture, radically speeds up the render time. The artist could use Cycles to light-up the environment, then switch to the conventional renderer to create the animation.
 
I've uploaded all of the project files to BlendSwap.com
You can download them here:

http://www.blendswap.com/blends/sci-fi/beam-runner-ship/
http://www.blendswap.com/blends/architecture/beam-runner-city-with-track/


I hope this was useful to someone out there.
Bye for now.

Tuesday 29 November 2011

Book Review

OpenGL 4.0 Shading Language Cookbook
Author: David Wolf
Publisher: Packt Publishing Ltd.
ISBN: 9781849514767
Pages: 340 
By Patrick Mount on 29th November 2011

Before delving into the brave new world of OpenGL 4.0 fragment shaders, make sure that your graphics card can support them. Supported Cards include:  Nvidia GeForce 400, 500 series and the ATI Radeon HD 5000, 6000 series

Essentially, this book is aimed at the intermediate to advanced C\C++ programmer, who also has experience with the implementation of fixed-function OpenGL applications, and who wishes to transition into the more direct GPU control-code, which shaders provide.

The book contains clear and concise examples of OpenGL code and it makes frequent reference to a couple of external libraries – GLEW and the GLM (mathematics library). The main IDE seems to be Nokia's Qt Creator, which is a strange choice, given that most professionals are probably using Visual Studio with GLUT.

If what I've just written makes no sense to you whatsoever, then this is not the book for you. It is very 'programmer-centric', covering not just the shaders, but how you bind and interface with them via your main application code. Although for artists like myself, who have a programming background, it is the ideal reference (or should I say recipe) book.

In chapter one, the author eases you into the subject by demonstrating how to create a basic OpenGL application with the additional libraries previously mentioned. I found this a bit tricky because I wasn't use to Qt Creator.

Chapter two introduces the reader to the fundamentals of the GLSL methodology, explaining the difference between vertex and fragment shaders and how they fit within the OpenGL pipeline. This section also refers to the basic shading algorithm of the old fixed-function model as a way of learning about the new shader-based model.

Subsequent chapters develop the simple application into more complex examples, covering topics like; Lighting and Shading Effects, Textures, Cube Mapping, Normal Maps, Screen Space Filters, Gaussian Blur, Bloom, Deferred Shading, Shadow Maps, Geometry and Tessellation Shaders.

Pros:
  1. Clear and concise example code 
  2. Very detailed written explanations, including the original mathematics
  3. The structure of the chapters eases you into the more advanced topics
  4. Impressive coverage of virtually every topic in shader-based real-time rendering
 Cons:
  1. Programmer-centric (not for the pure video game artist)
  2. Nokia's Qt Creator was probably not the best choice of IDE for the example code

Rating: 4 out of 5 stars

You definitely need this book in your library (whether it's home, college or business)

Direct Link:
http://www.packtpub.com/opengl-4-0-shading-language-cookbook/book


Tuesday 21 June 2011

Japanese Teahouse

This is a real-time animation using the Blender game engine.

The Teahouse is a low-polygon (game) model, consisting of:
- Ambient Occlusion Lightmap
- Tangent Space Normal Map
- Diffuse Texture Maps
- GLSL Fragment Shader to simulate the refraction of light through water
- Animated Normal Map to simulate the rippling of surface water
- Faux (non-RenderToTexture) reflection effect


Runs at 60 frames per second on the following spec:
- Pentium Duo-Core CPU 2.93GHz
- 3 GB RAM
- 32 bit OS
- nVidia GeForce 9500GTX Graphics Card